Write and test your self made API using Django in Flutter App
Step 1:
Install Django and django rest framework in your system
Make sure you have installed python and pip in your system.
pip install django
pip install djangorestframework
Rest Framework is responsible for generating restful apis more conveniently.
Create new django project,
django-admin startproject <project name>Open your terminal and execute,
python manage.py startapp <your appname>The above command creates new app inside your project.
Include your app and rest_framework in settings.py
INSTALLED_APPS = [
    'django.contrib.admin',
    'django.contrib.auth',
    'django.contrib.contenttypes',
    'django.contrib.sessions',
    'django.contrib.messages',
    'django.contrib.staticfiles',
    # include restframework
    'rest_framework',
    # apps
    '<your app name>'
]
In your <appname>/models.py, create model Article,
class Article(models.Model):
    title = models.CharField(max_length=200)
    description = models.TextField()

    def __str__(self):
        return self.title
Apply migrations,
python manage.py makemigrations
python manage.py migrate
In your <appname>/ serializers.py
from rest_framework import  serializers
from .models import Article


class ArticleSerializer(serializers.ModelSerializer):

    class Meta:
        model = Article
        fields = '__all__'
In <appname>/views.py
from rest_framework.decorators import api_view
from rest_framework.response import Response
from .models import Article
from .serializers import ArticleSerializer


@api_view(['GET'])
def get(self):
    articles = Article.objects.all()
    articleserializer = ArticleSerializer(articles, many=True)
    return Response(articleserializer.data)
In <appname>/admin.py
from django.contrib import admin
from .models import Article


admin.site.register(Article)
In your root/urls.py, Include the urls of your app.
from django.contrib import admin
from django.urls import path, include

urlpatterns = [
    path('admin/', admin.site.urls),
    path('article/', include('<appname>.urls')) # add this line
]
In your <appname>/urls.py, add api endpoints.
from django.urls import path
from .views import get

urlpatterns = [
    path('get/', get)
]
Now create superuser for your project. A super user is a user who manages the project.
python manage.py createsuperuser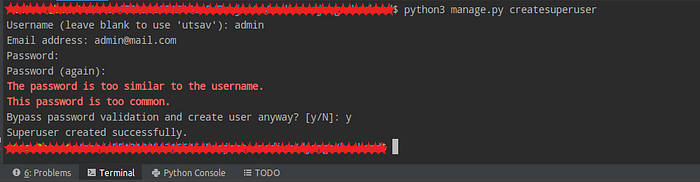
After creating super user, run this on terminal
python manage.py runserver 0.0.0.0:8000But this causes error,

In your command prompt or terminal, execute,
ifconfig |grep "inet"     (for linux)
ipconfig |findstr "Address" (for windows)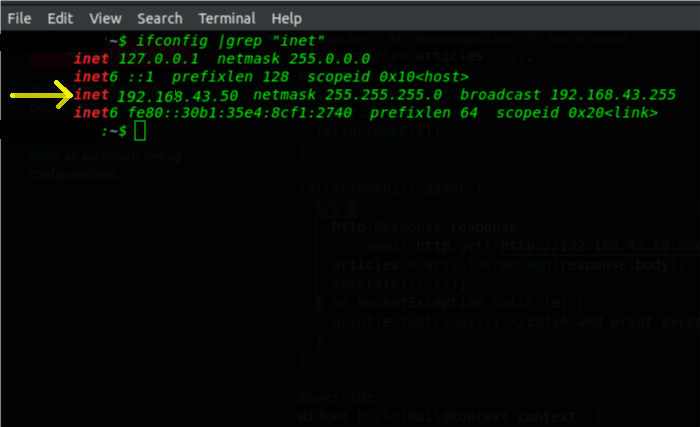
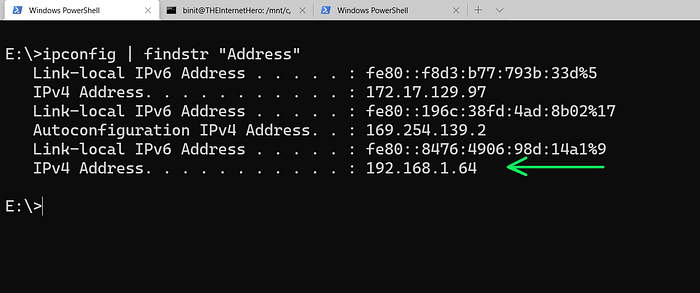
Add following in your settings.py file.
ALLOWED_HOSTS = ['0.0.0.0', '<your os address>'] # add 0.0.0.0 as allowed hostNow save and refresh the page,

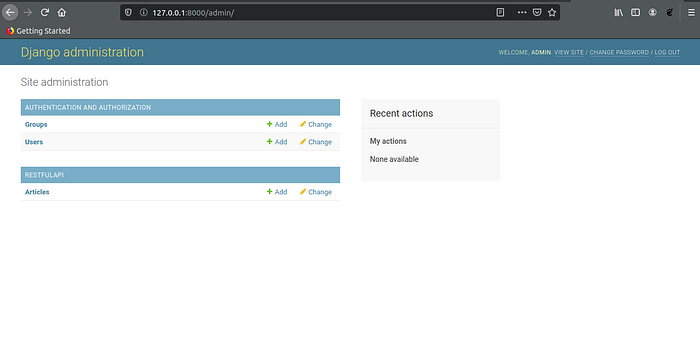
Now create your first Article by clicking on add.

Hurrah!! You developed well functioning django project.
Step 2:
Install Flutter in your system
Refer this article from official site
After installing flutter, open command line and execute following commands.
Before that make sure to install Visual Studio Code in your system or download it from here.
flutter create <your appname>   #this creates your new flutter app
cd <your appname>
code .   # starts visual studio code.
In your pubspec.yaml file, install http package.
http: <latest version>Run “pub get” command in your terminal.
In your lib/main.dart file,
import 'package:flutter/material.dart';
import 'homepage.dart';void main() {runApp(MyApp());}class MyApp extends StatelessWidget {// This widget is the root of your application.@overrideWidget build(BuildContext context) {return MaterialApp(title: 'Restful api',theme: ThemeData(primarySwatch: Colors.blue,visualDensity: VisualDensity.adaptivePlatformDensity,),home: Homepage(),);}
}
Create model Article to parse the response.
In lib/article.dart,
// To parse this JSON data, do//// final article = articleFromJson(jsonString);import 'dart:convert';List<Article> articleFromJson(String str) =>List<Article>.from(json.decode(str).map((x) => Article.fromJson(x)));String articleToJson(List<Article> data) =>json.encode(List<dynamic>.from(data.map((x) => x.toJson())));class Article {Article({this.id,this.title,this.description,});int id;String title;String description;factory Article.fromJson(Map<String, dynamic> json) => Article(id: json["id"],title: json["title"],description: json["description"],);Map<String, dynamic> toJson() => {"id": id,"title": title,"description": description,};}
Now in your lib/homepage.dart, create UI for fetching and displaying the data coming from localhost api.
import 'dart:io';import 'package:appname/article.dart';import 'package:flutter/material.dart';import 'package:http/http.dart' as http;class Homepage extends StatefulWidget {Homepage({Key key}) : super(key: key);@override_HomepageState createState() => _HomepageState();}class _HomepageState extends State<Homepage> {List<Article> articles = [];String windowsbaseUrl = 'http://192.168.1.64:8000';String linuxBaseUrl = 'http://192.168.43.50:8000';@overridevoid initState() {super.initState();fetchFromAPi();}fetchFromAPi() async {try {http.Response response = await http.get('$linuxBaseUrl/article/get/'); //choose base url as per your OSarticles = articleFromJson(response.body);setState(() {});} on SocketException catch (e) {print(e.toString()); //catch and print exceptions}}@overrideWidget build(BuildContext context) {return Scaffold(appBar: AppBar(title: Text("Api from Localhost"),centerTitle: true,),body: ListView.builder(shrinkWrap: true,itemCount: articles.length,itemBuilder: (BuildContext context, int index) {return ListTile(leading: CircleAvatar(child: Text("${articles[index].id}"),),title: Text("${articles[index].title}"),subtitle: Text("${articles[index].description}"));}));}}
Now compile your flutter code, execute following command;
flutter run
You’ve successfully run your code.
You can refer the code from github.